Linux
Introduction
This article mainly records the problems & solutions I’ve met when operating Linux systems
Common Commands
1. For a specific instruction please refer to here
| Command | Description |
|---|---|
| File Commands: | |
| ls | Directory listing |
| ls -al | Formatted listing with hidden files |
| ls -lt | Sort the Formatted listing by time modification |
| cd | Change to home directory |
| pwd | Show current working directory |
| mkdir dir | Create a directory dir |
| cat >file | Places the standard input into the file |
| more file | Output the contents of the file |
| tail -f file | Output the contents of file as it grows, starting with the last 10 lines |
| touch file | Create or update file |
| rm -r dir | Delete the directory recursively |
| rm -f file | Force to remove the file |
| rm -rf dir | Force to remove the directory dir |
| cp file1 file2 | Copy the contents of file1 to file2 |
| cp -r dir1 dir2 | Copy dir1 to dir2; create dir2 if not present |
| mv file1 file2 | Rename or move file1 to file2, if file2 is an existing directory |
| Process management: | |
| ps | To display the currently working processes |
| top | Display all running process |
| kill pid | Kill the process with given pid |
| killall proc | Kill all the process named proc |
| bg | List stopped or background jobs, resume a stopped job in the background |
| fg n | Brings job n to the foreground |
| Searching: | |
| grep pattern file | Search for pattern in file |
| grep -r pattern dir | Search recursively for pattern in dir |
| command | grep pattern | Search pattern in the output of another command |
| locate file | Find all instances of file |
| find . -name filename | Searches in the directory (represented by “.”) and below it, for files and directories with names starting with filename |
| pgrep pattern | Searches for all the named processes, that matches with the pattern and, by default, returns their ID |
| System Info: | |
| w | Display who is on line |
| whoami | Who you are logged in as |
| finger user | Display information about user |
| uname -a | Show kernel information |
| cat /proc/cpuinfo | CPU information |
| cat /proc/meminfo | Memory information |
| free | Show memory and swap usage |
| whereis app | Show possible locations of app |
| which app | Show which applications will be run by default |
| Compression: | |
| tar cf file.tar file | Create tar named file.tar containing file |
| tar xf file.tar | Extract the files from file.tar |
| tar czf file.tar.gz files | Create a tar with Gzip compression |
| tar xzf file.tar.gz | Extract a tar using Gzip |
| gzip file | Compresses file and renames it to file.gz |
| gzip -d file.gz | Decompresses file.gz back to file |
| Network: | |
| ping | Ping host and output results |
| whois domain | Get whois information for domains |
| dig domain | Get DNS information for domain |
| wget file | Download file |
| wget -c file | Continue a stopped download |
| Shortcuts: | |
| ctrl+z | Stops the current command, resume with fg in the foreground or bg in the background |
| ctrl+r | Type to bring up a recent command |
| Shutdown: | |
| shutdown -h | Shut down immediately after services are stopped |
| shutdown -r | Restart after services are stopped |
Vim
Vim is a popular and build-in text editor of Linux systems. In most of the cases I use it to modify configuration files of networking or apps
1. Three modes
- Command mode: Default mode, can be used to move the cursor to view content
- Insert mode: Press the “i” button to enter, and edit the text
- Bottom-line mode: Press the “:” button to enter, and to save and exit

2. Commands in the bottom-line mode
| Command | Description |
|---|---|
| :w | Write to disk |
| :w! | Force writing to disk when the file is read-only |
| :q | Leave |
| :q! | Force leaving without saving |
| :wq | Leave after writing to disk |
| :wq! | Leave after forcing writing to disk |
Network Configuration
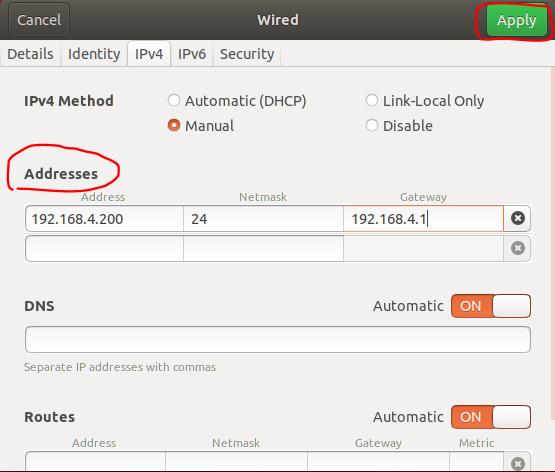
In case we have to construct a network includes Linux systems, usually we have to config static IP addresses for them. Here I use “Ubuntu 18.04” as an example (configurations on “CentOS” and “Fedora” are similar)
1. System UI
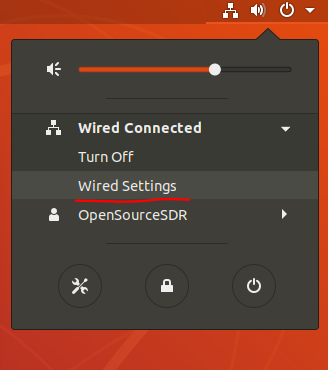

2. CommandLine
- Use
ifconfigto check the name of targeted network card

- Use
sudo vi /etc/network/interfacesorsudo gedit /etc/network/interfacesto open the configuration file

- Insert your modification based on the following template, and save the changes
auto ens33
iface ens33 inet static
address 192.168.4.200
netmask 255.255.255.0
gateway 192.168.4.1

- Use one of the following commands to restart the network or simply restart the system to activate the new configuration:
/etc/init.d/networking restart
sudo service network-manager restart
sudo service networking restart
Change Permission
1. Problem
- I used to install the SysmonForLinux on my ubuntu18, and the system logs that Sysmon generates are stored in the “/var/log/syslog”. Later I wanted the transmission tool Nxlog to transmit those logs to my ELK mainframe. However, the permission of “syslog” is read-only, Nxlog cannot retrieve any data from it
2. Rationale
- Insufficient privilege
3. Solution1
- A common thought to address the problem aforementioned is to change the permission of the targeted file using
sudo chmod 777 /var/log/syslog. It does work at first, nevertheless, I find that the permission of “syslog” will turn back to read-only each time I restart the system
4. Solution2
- Another way to solve the problem is to grant the application a higher permission to access the target. Using
sudo gedit /etc/passwdwe can not only grant apps but also users. To do this, simply change the corresponding number after the “x:” to “0”

- In the highlighted part of the pic above, I’ve granted Nxlog the highest permission as the changed number is actually the UID, and the UID of root user is “0”
Remove File Lock
1. Problem
- The error below often occurs when installing applications using the apt command on Ubuntu:
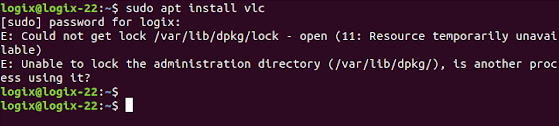
2. Rationale
- File locks are used to prevent two or more processes from using the same data. When apt or apt-get commands are running, they create lock files in a few places. If the previous apt command was not terminated properly, the lock files are not deleted and hence they prevent any new instances of apt-get or apt commands
3. Solution
- Use
ps -e | grep aptto find out related processes - Use
sudo kill PIDto terminate processes if returned - Use the following commands to safely remove the locks:
sudo rm /var/lib/apt/lists/lock
sudo rm /var/cache/apt/archives/lock
sudo rm /var/lib/dpkg/lock